Comments Off on Marketing Administration

Marketing Administration

Posted December 10th, 2008 in Certified Administrator by John Coppedge

Define a Campaign

Enterprise+

A campaign is salesforce’s method of tracking marketing initiatives.  Leads and contacts can be added to marketing campaigns, which can then be used to track response rates, ROI, and other statistics.


Describe when to use Campaign Hierarchies

Campaign Hierarchies should be used when one campaign is a part of another.  Let’s say that you’re marketing a new product called Widget G, and you had a print and electronic marketing campaign for this new product.  You could create the below hierarchy and then track both with the parent campaign.

  • Widget G
    • Print
    • Electronic

See “Setting up a Campaign Hierarchy”.  Max of 5 levels of hierarchy.

Rolled up fields:

  • Total Num Sent in Hierarchy
  • Total Expected Revenue in Hierarchy
  • Total Budgeted Cost in Hierarchy
  • Total Actual Cost in Hierarchy
  • Total Leads in Hierarchy
  • Total Converted Leads in Hierarchy
  • Total Contacts in Hierarchy
  • Total Opportunities in Hierarchy
  • Total Won Opportunities in Hierarchy
  • Total Value Won Opportunities in Hierarchy
  • Total Value Opportunities in Hierarchy
  • Total Responses in Hierarchy

To enable campaign hierarchies, add Parent Campaign to the page layout and enable the campaign hierarchy statistics fields.  I also had to change the field-level security to visible for most of these formula fields, although this was not stated in the documentation.


Create a Campaign targeting both existing customers and new Leads

Create a campaign.  Click Manage Members.  Add both member types.  Alternatively you can add each contact/lead individually by clicking on that person and manually associating them with the campaign (the related list must be added to the page layout for both objects).


List the methods to associate Leads and Contacts to a Campaign

  • A report of existing leads or contacts
    • Run report of contacts/leads.  Click “Add to Campaign”.
  • A list view of existing leads or contacts
    • Campaign –> Manage Members –> Add Members – Existing (Contacts/Leads)
  • An individual lead or contact record
    • Click add from the Campaign related list
  • Campaign –> Manage Members –> Add Members – Import File (will create new leads and associate them with the campaign)


Describe how to use Lead Queues to manage Leads

Use lead assignment rules to forward leads to the correct queue.  A queue would be a group of users that would handle a particular set of leads.  In this example the lead queue is based upon region:

image


Describe how to use a Lead Assignment Rule to assign and route Leads

The above example is good.  The rules are processed in order, and if none of the rules are met then the lead is sent to the default lead owner.  Naturally “Assign To” can be different users/queues.


Describe the use cases for Web-to-Lead

Any time an online contact form is used for a sales-resulting form would be appropriate.  For instance, a contact us page where a sales person will call the prospect.  There are plenty more use cases… essentially anything where the person filling out the form would be considered a lead in salesforce is an appropriate use.


Describe the functionality of a Lead Auto-Response Rule

Lead auto-response rules allow you to determine what response email is sent to the website submitter.  For instance if you have many contact us pages- one for the US and one for each additional country served- each of theses pages may have a different email response.  These work in the same fashion as assignment rules- follow rules in order and if none met use default.


Build a Lead Queue, Assignment Rule, Web-to-Lead, and corresponding Auto-Response Rule

  1. Create lead queue
  2. Set lead defaults (if no rules met)
  3. Create assignment rule
  4. Create web-to-lead form
  5. Create auto-response rule mimicking assignment rule


Measure Campaign results

Results can be measured by:

  • Individual campaign detail page.
    • Campaign detail page of top-level campaign can show the statistics for the campaign hierarchy (requires that the fields be enabled and added to the page layout).
  • All of these details can be pulled through both canned and custom reports.

Measurements:

  • Total Responses
  • Total Leads
  • Converted Leads
  • Total Contacts
  • Num Total Opportunities
  • Num Won Opportunities
  • Total Value Opportunities
  • Total Value Won Opportunities

And all of the hierarchy measurements:

  • Total Responses in Hierarchy
  • Total Opportunities in Hierarchy
  • Total Leads in Hierarchy
  • Total Won Opportunities in Hierarchy
  • Total Converted Leads in Hierarchy
  • Total Value Opportunities in Hierarchy
  • Total Contacts in Hierarchy
  • Total Value Won Opportunities in Hierarchy
  • Total Num Sent in Hierarchy
  • Total Actual Cost in Hierarchy
  • Total Expected Revenue in Hierarchy
  • Total Budgeted Cost in Hierarchy


Describe the process and effects of converting a Lead

When you convert a lead:

  1. An account is created with the lead’s company information
  2. A contact is created with the lead’s contact information and is linked to the new account and the campaign the was associated with
  3. An opportunity is created with the lead’s information (including the campaign source field) and linked to the account (end of quarter set as close date, first selection of stage automatically selected)
Comments Off on Analytics

Analytics

Posted December 10th, 2008 in Certified Administrator by John Coppedge

Describe the administrative restrictions on Standard Reports

A user can only report information that they have “read” access to.  This means that if they cannot see a certain user’s data, they cannot report it either.  This applies for both field level security and object level security.  Page layouts have no impact on reporting capabilities.


Run a Standard Report

Click reports tab, click on report.  “Run Reports” permission required.  Standard reports are the ones that come pre-installed.  They cannot be modified or removed.


Create a Custom Report

Reports tab, Create New Custom Report.  “Create and Customize Reports” permission required.  You can also run a report, make changes and then save it as a new report.


Search for Custom Reports

On the reports tab- When you click “Find Reports” only custom reports are listed.


Explain the differences among report types

Tabular – simple list (CSV style report).  Provides totals for the entire list of data.

Summary – sorts and sub-sorts data by row.  Provides totals for each section of sorted data (rows).

Matrix – sorts and sub-sorts data by row and column.  Provides totals for each section of sorted data (rows & columns).


Explain Custom Report Types

Pro+ edition, permission “Manage Custom Report Types” required.  A report type links data from different objects together through lookup or M/D relationships.  The link travels the reverse direction of the relationship for Report Types (the data in the related list, not the lookup relationship itself).  For instance, if Account is your primary object then you can link to Contacts and Opportunities.  Whereas if Contacts were your primary object, you could link to activities but not accounts.  Limit of 4 objects per report type.

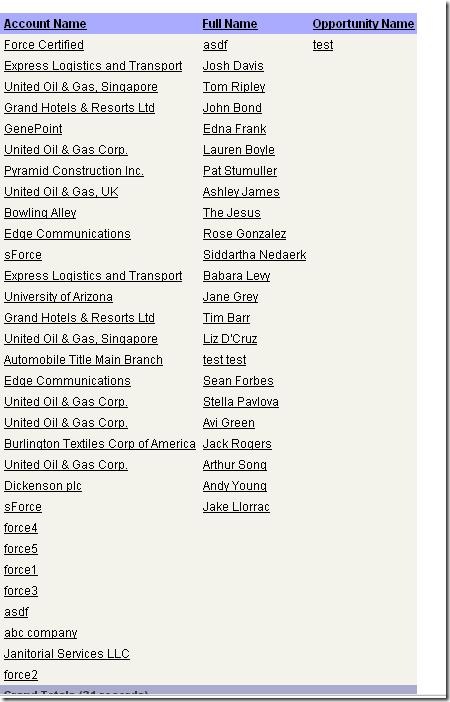
Example:  Show all accounts, and any related contacts, and any related opportunities.

cust report 1

cust report 2

Note the “with or without related records” and the result (same as top line of the above report):

cust report 3

cust report 4

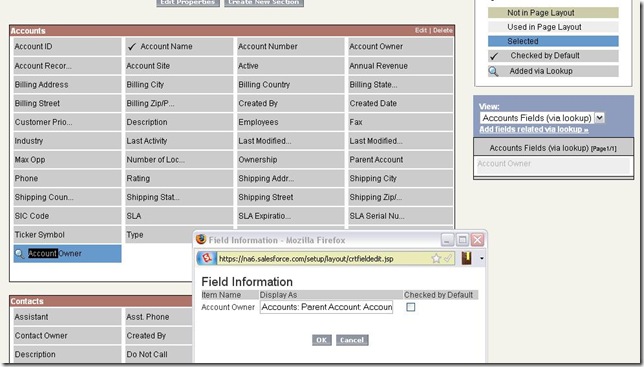
You can add data from related lists as custom fields on your report.  This is a fantastic alternative to creating simple cross object formulas to accomplish the same on standard reports.  In my example I create a field for the owner of the parent account.  See the “Add fields related via lookup”… its your friend.

cust report 5


Create charts to display Report results

Graphs are not available for Tabular reports.  Grouping must be selected.  After all, you would only have one bar!

Columns to total becomes the bar/line data portion of the graph.  The grouping becomes the unit that is measured.  For instance, if I group by “Account Owner” and sum number of records:

image

This process is very similar to dashboard creation, and that is probably easiest to learn just by doing.  Create a sample summary and matrix report, and get an understanding of the differences between the two, as well as all of the report options.


Use Advanced Filter criteria to narrow Report results

Standard filters:

  • View: Selection of object by ownership (mine only, team, etc.)
  • Date range: Selection of any date range on the object

Advanced filter:

  • Filter operators
    • equals
    • not equal to
    • less than
    • greater than
    • less or equal
    • greater or equal
    • contains
    • does not contain
    • starts with
    • includes (multi-pick list)
    • excludes (multi-pick list)
  • Advanced Options
    • Allows you to set AND/OR per filter criteria line

The key limitation with filtering is that it cannot accept variables on both sides of the equation.  For instance, you could not create a filter that says “show me all accounts that contain the account’s state” (because account state is a variable) but you could say “show me all accounts that contain the word ‘California’”.  Anything to the right of the formula must be static.


Create Custom Summary Formulas

Columns to total- New Formula.

Result of formula: Number/Percent/Currency

Options to formulate:

Record Count Sum

Any numeric field: Sum/Largest Value/Smallest Value/Average

Summary formulas let you perform the above math across the entire report.  You cannot inject any logic into these formulas.


Choose settings for Conditional Highlighting

Select Chart & Highlights.  Select a summary total, select values and colors for each point.  This will only color highlight summary totals, and is only available for Summary/Matrix reports accordingly.


Describe the capabilities and purpose of a Dashboard

A dashboard is a compilation of different reports or external data.  This collection of reports can be designed for a specific purpose.  For instance, a Sales dashboard may have information about sales for each sales rep, number of calls made, etc.  A dashboard is only as current as its last refresh.  Dashboards can be refreshed on a schedule (and emailed upon refresh), or manually.  Ultimately their purpose is to provide information from several reports in one location.


List Dashboard component types

  • Chart
  • Table
  • Metric
  • Gauge
  • Custom S-Control


Create a Dashboard and add components to it

View some of the salesforce dashboards as examples.  Create your own- make sure to try out each report type and dashboard metric.


Print and export Reports

Both options are available from the report itself.  Export is available from the reports list.   Printable view gives you an excel document formatted for pri
nting.  Export gives you a CSV/Excel document with sort-friendly data.


Email and schedule a refresh of a Dashboard

EE/UE only.  Up to 5 contacts outside of Salesforce users can be emailed.  From the refresh menu on the dashboard, select schedule.  See “Scheduling a dashboard refresh” for more info.


Define Running User and how it affects the Dashboard results

The dashboard will use the permissions of whoever is selected as the running user.  This means that if a system administrator is the running user, all data can be seen and subsequently reported, while a standard user in a lower role may display different results.  However that standard user could potentially have permission to view the administrator’s dashboard.  In that case the user would have permissions to view the top-level information in the dashboard.  Once they clicked into a report within the dashboard, that report would display whatever records they have access to view (which could potentially be different than the top level dashboard information).

Example:

Roles:

  • Management
    • Sales User

Administrator creates report for all opportunities (includes Management and Sales User).  This report is added to the sales dashboard which is viewable by all users.  Sales User can see the top level detail in the dashboard.  Now, let’s say that the sharing model for opportunities is set to private, which means that sales user would not be able to view anyone else’s opportunities.  When sales user clicks on a report within the dashboard, that user will be limited to seeing the records that he has permission to view (only his own), and the totals in the report would be different than the dashboard itself.

Comments Off on Data Utilities

Data Utilities

Posted December 10th, 2008 in Certified Administrator by John Coppedge

Describe the function of an External ID

  • Each object can have a maximum of 3 external ID fields.
  • The external ID can be a number, text, or email field.
  • An external ID can be used to prevent duplicate entries when importing data.
  • An external ID makes it much easier to update data in Salesforce from an external system.
  • Additionally external fields are searched from the side bar.  Here is a good link in the boards for more info.
  • See also “Custom Field Attributes”.


List and describe the different tools and use cases for data migration

See “Accessing the Import Wizards” & “Importing Overview”.

Personal Edition can import contacts and accounts.  Pro+ can import custom objects, leads, solutions, etc.


There are several different tools for data migration:

  1. Data import wizards- a) user can import their own contacts and accounts, b) system administrator can use wizards to import data for entire company
  2. Data loader – wide variety of uses, requires use of salesforce id for each record
  3. Outlook/Lotus Notes sync – users can manually associate their contacts to an existing salesforce.com org
  4. Microsoft Office connector – excel can be used to upload data.  Should not be referenced on the test, but something you should know exists.

data import


  1. Import My Accounts & Contacts is limited to records that you own, and is limited to a maximum of 500 records.  This wizard is designed specifically for users to upload their own records.  Can accept records exported from Outlook, Act, or any other CSV file.
  2. The various import wizards under administrative setup require administrative privileges and can import up to 50,000 records.  These wizards can be used to update data without the record ID.  Matching type depends on the object- for instance, contact can be matched via email address for full name.
  3. The data load is the least user-friendly of the group.  It requires the salesforce record ID for each transaction (excluding additions).

Update existing data via import

Perform an import using the data import wizard.  When prompted put check the box to overwrite account info.  This will actually overwrite contact and account information.  The contact is matched based upon the initial criteria specified (full name, sf id, or email).

import- overwrite account

This is how contacts and accounts manage updates using data import.  The other objects prompt at the beginning of the wizard to insert or update:

image


Define when to use the Data Loader

See “When to use the Data Loader”.  The key limitations of web-based importing are a) max of 50k records, b) not all objects are supported, and c) no scheduling.  Mass deletion of custom objects for instance is not supported.  Mass transfer applies to accounts, leads, and custom objects.


List the functions of the Data Loader

  • Insert
  • Update
  • Upsert (update, if the record does not exist, then insert)
  • Delete
  • Export


Mass Update Records

Many mass updates can be performed through the web interface- transfer accounts, delete records (standard objects), reassign teams, and update addresses for instance.  Data import wizards also have an option to update existing information as discussed above.  Those options not available on through web tools must be performed through the data loader.  This requires matching the Salesforce ID of the record and appending the data to be updated to a CSV and then running the update.


Mass Delete Records

Most record types can be mass deleted through the web interface.  Custom objects cannot be mass deleted through the web interface; the data loader must be used.  To do so, run a report with the record ID listed.  Export that to CSV and load that into the data loader to perform the deletion.


Describe the capabilities of the Recycle Bin

The recycle bin holds records for 30 days before they are automatically deleted permanently.  You can undelete a record and all of the associated records will accompany (if you undelete a contact, all of the activities will get undeleted as well.  Recycle bin storage (in records) = Storage size in MB x 250.  (e.g. 1gig storage = 250,000 records max recycle bin).


Request and download a weekly export

Enterprise and Unlimited only.  Cost @ Professional.

Setup –> Data Management –> Data Export.  Schedule.  Every week you will get a zip file containing your entire company’s Salesforce data.


Explain how Salesforce allocates storage

Storage is split into two sections:

Data Storage: the data stored in each record- activities, accounts, contacts etc.

File Storage:  file attachments, documents

Comments Off on Data Validation

Data Validation

Posted October 31st, 2008 in Certified Administrator by John Coppedge

Define Data Validation

Group+ Edition

Data validation is a method to conditionally prevent records from being saved; it is separate from field level security and page layouts.


List common use cases for Data Validation

See “Useful validation formulas”.  A common usage would be to prevent an opportunity from being saved if the close date is in the past.


Describe when Data Validation Rules are enforced

Data validations are enforced whenever a record is saved.  This includes the data loader, mass transfer records, importing records, etc.  Validation rules during lead conversion are only active if enabled.  See “Validation Rule Considerations” for details.


Create Data Validation Rules

Validation rules are created per object, and make use of formulas.  I would strongly recommend reading and trying a few from the list “Useful Validation Formulas”.

Comments Off on Workflow Approval Processing

Workflow Approval Processing

Posted October 31st, 2008 in Certified Administrator by John Coppedge

Define the basics of the Workflow Approval Process

Let’s go through the steps:

  1. User submits record for approval.
    There is no method for automatic approval submission.
  2. Does this record match the criteria for any approval processes on this object?
    If yes –> Step 3
    If no –> Reject
  3. Perform initial submission actions
    This will always include locking the record so that no further changes can be made until the approval process is finished.
    This can also include other workflow actions.
  4. Record enters approval steps.
    Appropriate parties must approve/deny record.
  5. One of 3 approval process completions occurs.  In addition to locking or unlocking the record, each of these completions can has its own set of additional workflow actions.
    Approval.  Record is approved by all parties.  The record is locked by default.
    Rejection.  Record is rejected by any part.  The record is unlocked by default.
    Recall.  Record is recalled by submitter. The record is always unlocked.


Compare and contrast the Approval Processes versus Workflow

Workflow Rule Approval Process
Automatic (triggered when record matches criteria) Manual.  Can only be invoked if record matches criteria.
No interaction required (time-based workflow rules are transparent as well). Each step of the approval process requires interaction from a user (approve/reject).
Uses workflow actions Uses workflow actions
Does not lock the record under any situation Locks the record during the approval process.
Changes to record tracked normally (as if user initiating the workflow rule made the change) Approval process audit history listed in separate related list on object


List the differences between the Jump Start Wizard and the Standard Approval Process Wizard

The jump start wizard will create an approval process with one step using a set of default values.  See “Approval Process Jump Start Default Selections”.  Essentially when you create an approval process using the wizard you’ll get an approval process with one approval step and one set of filter criteria with the default values.


Explain how to route Approvals

Approvals occur within approval steps.

Each approval step is:  1) ordered in number of execution, 2) has its own filter criteria for entry, 3) designates an approver.  Here’s how it plays out:

  1. Record is submitted for approval and meets initial criteria.  Start first approval step.
  2. Does record meet criteria (or formula) for this approval step?
    If no –> skip/approve/reject.
    If yes –> require approval.  Designated approver approves/rejects and chooses the next approver if required.  If the next approver is automatically selected through a hierarchical relationship, the current approver is used to determine the relationship (not the approval initiator).  This can be used to route approvals through several tiers of management.
  3. Repeat step 2 until out of finished with approval steps.  If record has passed/skipped all approval steps, then process approval actions.

See “Useful Approval Processes” for examples and additional info.


Create and test the Approval Process

Take a simple hierarchy:

  • VP
    • Manager
      • Worker

Create an approval process using the hierarchy from worker to VP with filters at each step.


Identify the settings in creating Workflow Approval Processing

Filter Criteria

Next automated approver – used for hierarchical approvals

Administrator only or Administrator and Approver record modification

Email template – template that is sent to approver when an approval is required from that individual

Approval Page fields – these are the fields that show up on the approval page

Security settings – set if page can be viewed from Salesforce mobile, or only from a web browser

Specify initial submitters – who can submit the record for approval (by default this is the record owner only)