Comments Off on Activity

Activity

Posted May 6th, 2009 in Certified Administrator by John Coppedge

Compare and contrast Tasks and Events

Tasks Events
Use a single date entry Use a date/time entry for both start and end
Represent to-do items (including phone calls) or emails Represent calendar items
Can have an associated reminder pop-up Can have an associated reminder pop-up
No recurring functionality built in Can have recurring series of events (if setting is enabled)
Tasks marked as completed when status of record is changed to completed Event marked as completed when the end time of the event is passed by the current time


Manage Public Calendars and Resources

Pro+

Customize –> Activities –> Public Calendars and Resources

  1. Create the calendar
  2. Create sharing rules for the calendar (by default no one has access)
  3. Mark the calendar as active

Sharing rules must be established for access to be granted to users.

A resource can be invited to a meeting, and the calendar will reflect this usage.

See “Managing Public and Resources Calendars”.


How to view public calendars and resources

Pull up the calendar view (you can access this by clicking the day, month, or yearly view from your page):

image

Click change, and select Public Calendars & Resources

image 


Identify and describe the Activity Settings

  • Task Fields
  • Task Validation Rules
  • Task Triggers
  • Task Buttons and Links
  • Task Page Layouts
  • Task Record Types
  • Event Fields
  • Event Validation Rules
  • Event Triggers
  • Event Buttons and Links
  • Event Page Layouts
  • Event Record Types
  • Activity Custom Fields
    • Defined custom fields apply to both tasks and events
  • Activity Search Layouts
  • Activity Buttons
  • Public Calendars and Resources
  • Activity Settings (default on)
    • Enable Group Tasks
    • Enable Sidebar Calendar Shortcut
    • Enable Creation of Recurring Events
    • Enable Activity Reminders
    • Enable Spell Checker on Tasks and Events
    • Enable Email Tracking
    • Show Event Details on Multi-User Calendar View
    • Enable Multiday Events


Describe the capabilities of Multiday Events

Not to be confused with “All Day Events”, a multiday event is an event that lasts longer than 24 hours – this includes an “All Day Event” that stretches over more than 1 day.  Multiday events cannot be synchronized with Outlook.  Multiday events must be enabled (Activities Settings).

Comments Off on The Force.com AppExchange

The Force.com AppExchange

Posted May 5th, 2009 in Certified Administrator by John Coppedge

Describe the Force.com AppExchange

The AppExchange is a website for locating, purchasing (if a fee is associated), and installing 3rd party software into your Salesforce organization to extend its core functionality.

There are hundreds of AppExchange packages available – everything from expanding marketing capabilities to database integration packages.  Check out the full list here.

In addition, there are several great free AppExchange packages worth discovering, including one I’ve had great use for: Inline Account Hierarchy.  All Force.com Labs packages are free (183 packages at time of writing) and can be viewed by clicking the publisher tab on the above link.

Click this link to view free apps by all publishers.


Describe the characteristics of Managed Packages

Managed packages are similar to the force.com platform itself.  They:

  • Can be upgraded post-installation by the package publisher
  • Support subscription-based licensing
  • May contain portions that are locked

Unmanaged packages on the other hand are not locked and cannot be upgraded by the publisher.

See “About Managed Packages”.


Install a package

Find the package on AppExchange and install it.  This will list the requirements for the package and require a system administrator’s credentials.

  1. Find the package on the AppExchange and click on “Get It Now”.  Provide administrator user credentials to your org.
  2. Confirm the package requirements
    image
  3. Approve API access
  4. Choose security settings
    image
    From SF:

      Admin access only
      Gives no custom object permissions to any user profile except the administrator’s and any profile with the "Customize Application" permission. This option also sets field-level security to visible and editable for all fields included in the new the features in this package. After installation, if you have Enterprise, Unlimited, or Developer Edition, you can give the appropriate user permissions to your user profiles as needed.
      Grant access to all users
      Gives full access to custom objects included in the new package. Additionally, sets field-level security to visible and editable for all fields included in the new package.
      Select security settings
      Allows you to choose the usage access for all existing custom and standard profiles in your organization. You can set each profile to have full access or no access for the new package and all its components.

  5. Install


Uninstall a package

Setup –> View installed packages.  Select the package and then click uninstall.  You can view currently installed packages and package status at this spot as well.  You will get an email when the package removal is complete.

Comments Off on Custom Objects, Applications, & Tabs

Custom Objects, Applications, & Tabs

Posted May 1st, 2009 in Certified Administrator by John Coppedge

Describe a Custom Object

A custom object is one that is not initially packaged with the application.  If it isn’t a standard object, it must be a custom object.  An example of a custom object could be a Payroll object created for a custom payroll application.  Accounts, Contacts, Opportunities, and so on are all standard objects.


Describe the types of relationships that can exist between objects

One to Many

There are 3 types of relationships that can be created in Salesforce.com – master-detail, lookup, and hierarchical.  Each of these relationships is a one to many relationship.

Many to Many

Many to many relationships are established by creating a linking object.  The linking object must have a relationship to each of the objects it is linking together.  For instance,

In a custom application, two custom objects “Job Posting” and “Applicant” require a many to many relationship.  To do this, create an object “Job Posting Applicant Link” (the name is not important), and create lookup (or master-detail) relationships on this object to both "Job Posting” and “Applicant”.  If master-detail relationships are used, when either a “Job Posting” or an “Applicant” is deleted, all related "Job Posting Applicant Link” records are deleted.

The related lists on Applicant and Job Posting can be configured to displayed the corresponding information from each object through the linking object.

image

The only way to create a seamless (no visible linking object to the end user) many to many relationship is to use custom code.  Please vote to include this functionality: Pure many-to-many relationships.

See “Creating a Many-to-Many Relationship” for more details.

Relationship types

Master-Detail

  • The owner of master record automatically owns all associated detail records.
  • Security controls for the master record control the detail record.
  • A detail record must be linked to a master record in order to save the record (e.g. you must link an opportunity to account to save the opportunity).
  • Only one level deep – a detail object cannot also be a master object.  Please vote to remove this limitation: Multiple Master-Detail relationships.
  • A detail record can have two different master records (two master-detail relationships must be created).
    • This feature was released in Summer 08 to give greater flexibility when creating many to many relationships as described above.  Prior to then, only one master-detail record could be present per object, meaning that record deletions for object “Job Posting to Applicant Link” could only be triggered by a “Job Posting” deletion or an “Applicant” deletion; not either.

Lookup Relationship

  • One to Many relationship links one record to another record.
  • Can link standard to custom objects and vice versa, or link to the same object type (parent account, for instance).

Hierarchical

  • A lookup relationship on the user object to the user object (for instance the standard field “Manager”).
  • Record cannot point to itself (I cannot be my own manager).

See “Overview of Relationships” for more details.


Create a Custom Object

Create –> Objects

Options:

  • Label
  • Plural Label
  • Object Name
    • Used for API calls
  • Description
  • Context-Sensitive Help Setting
  • Record Name
    • Appears on related lists, e.g. “Account Name” instead of “Account”
  • Data Type
    • Either text or auto-number.
  • Allow Reports
  • Allow Activities
  • Track Field History
    • Enables the option to track fields- you still need to add the fields to be tracked and add the related list to the page layout.
  • In Development / Deployed
    • If listed In Development, only users with the “Customize Application” permission will be able to see it.


Describe a Custom Object Tab and a Web Tab

Custom Object Tab

A custom object tab provides a tab to access a custom object.  Creating a custom object tab will do the following:

  • Enable search results for the custom object.
  • Enable the object as an option in the “Create New…” menu in the sidebar.
  • Set the icon that represents the object.
  • Set the color scheme for the page layout of the icon.

image 

If a custom object does not have an associated tab, it is only possible to access the object (from the UI) through reporting (if enabled) or through related lists where applicable.  Assets is a standard object example of this situation.

Group+ Edition


Web Tab

Web tabs can be used link in external content from websites other than Salesforce via an S-Control or URL.  Here is an example of a web tab set to http://www.google.com:image

Group+ Edition


Create a Custom Object Tab

Create –> Tabs

  • Only one tab per object is possible.
  • Enabling a splash page for the object will let you configure an introductory page (similar to introductory pages in setup; for instance, email to case setup), and will give the user the following option:
    image


Create a Web Tab

Create –> Tabs

There are a few more options for web tabs:

  • Choose width
    • Full page width – removes left sidebar
    • 2 columns with Salesforce sidebar
  • S-Control or URL
  • Content Frame Height
    • You can set the maximum height for the frame (this will create a scroll bar within the frame if the page is longer than the height)
  • Splash Page Selection


Describe a Custom App

An application determines which tabs are listed by default.  A custom application is no different- you can choose from standard/custom objects and what tabs are displayed by default.  A user can customize this list per application specific to their account.

Applicatio
ns have no impact on object, field-level, or tab security (if a tab is hidden on the user profile, it will never be visible).

Example:

Select my custom Projects application:

image

And get the custom image (Projects Home w/triangle) with just the Projects tab visible:

image 


Create a Custom App

Create –> Apps

  • Custom Image
    • The image must be a document marked as an Externally Available Image to be selectable
  • Default Landing Page (Home or object)
  • Select tabs
  • Assign visibility to profiles
Comments Off on Salesforce Console

Salesforce Console

Posted April 17th, 2009 in Certified Administrator by John Coppedge

Describe the functionality of the Salesforce Console

The console provides a list view and related records into one screen.  This allows users to access information across multiple records and multiple object types on one screen without the use of VisualForce pages, custom formulas, or any other code.


Describe the components of the Console Tab

The console page layout determines what objects types are selectable by the user in the console (top left drop down menu).  The mini page layout selects the view of the side bar of the appropriate objects (right side bar, labeled “related info”).  The detail display is determined by the normal page layout for the object.

image


Set up the Salesforce Console

  1. Create console layouts (determines which objects are selectable)
  2. Define page layouts for all objects referenced by console
      1. The mini console layout determines which records are displayed via lookup relationship in the right side bar.  In the above example the mini page layout for case would include Case Contact, and Account Name.
      2. The mini page layout determines which fields are displayed in the right side bar of the console (it also impacts hover details and event overlays for the object).  In this example, the mini page layout for the contact object would include Name, Account, Title, Phone, Home Phone, Mobile, Email, and Mailing Address.  Related lists can be added to the mini page layout as shown above on account (related cases are displayed, bottom right of screen).
  3. Assign profile to console layout and enable the tab for the profile
    Customize –> Console –> Console Layouts
    image

See “Console Setup Tips & Hints” for more info.


Navigate within the Salesforce Console

In the above graphic, clicking on a record from the list view will display that record in the detail display window.  As a record is displayed in the detail display, the ride side bar is populated with its related records.

Configure the console and spend a few minutes hopping from record to record and should be very self-explanatory.

Comments Off on Service & Support Administration

Service & Support Administration

Posted April 17th, 2009 in Certified Administrator by John Coppedge

Define a Case

From Salesforce:

A case is a detailed description of a customer’s feedback, problem, or question. Your organization can use cases to track and solve your customers’ issues. You can enter cases manually in the Cases tab, or your administrator can set up Web-to-Case and Email-to-Case to gather customer feedback from your company’s website and customer emails. Your customers can also create and submit new cases on your Self-Service portal.

Understand that cases are typically used for issue tracking and beyond that it really depends on your organization’s implementation.


Describe use cases for Case Hierarchies

Case hierarchies can be used to track sub-cases.  For instance, let’s say that the IT department uses cases to log new user creations.  In this situation, each new user requires 3 different accounts: salesforce.com, unix, and windows.  HR must also prepare the person’s paperwork and have them sign off on this documentation.  Here’s how this could break down using case hierarchy:

  • Parent Case: New hire (person name), Case Owner: HR Person
    • Child Case: Windows Login, Case Owner: Windows Admin
    • Child Case: Unix Login, Case Owner; Unix Admin
    • Child Case: Salesforce.com Login, Owner: SF Admin

Note that each case is owned by a different user (HR, Windows Admin, Unix Admin, SF Admin).  This gives you much greater flexibility and accountability than having a single shared case.


Describe how to use Case Queues to manage Cases

Case queues work like any other queue.  Unassigned cases should get assigned to a case queue until a user takes ownership of the issue.  This is useful if you have a staff of different users resolving cases as they are available for work.


Describe how to use a Case Assignment Rule to assign and route Cases

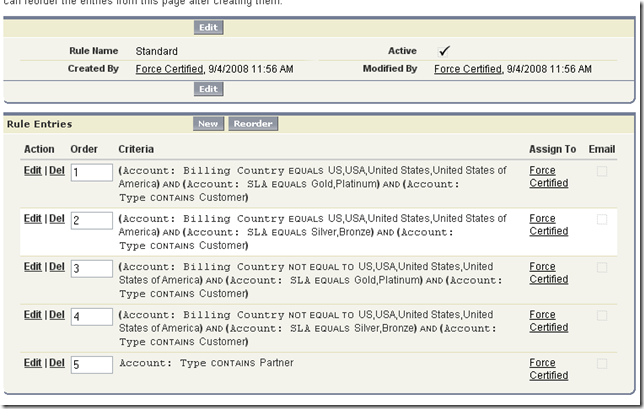
Case assignment rules are similar to lead assignment rules.  Rules are executed in order; if no order matches the default assignment is used.
image


Describe use cases for Web-to-Case

Customer request page on your company website.  IT support request page on an intranet page.  You can repurpose web-to-case for plenty of other processes as well.


Describe uses cases for Email-to-Case

An email address like support@salesforce.com.  Basically the same principal applies to email-to-case as web to case: a support email account or helpdesk/call center situation is ideal for this.  An added benefit of email-to-case is that incoming/outbound emails can be tracked and attached to cases automatically.

Note that email to case prior to Spring 09 required a software agent to be run behind the company firewall.  Email to case on demand was released as a feature in the Spring 09 release and removes the need for this agent.  Understand how each of these works and the differences between the two (essentially the agent monitors emails and assigns cases as needed, while on demand uses email forward to allow this process to happen on the Salesforce end).


Describe the functionality of the Case Escalation Rule

Case escalation rules are designed to escalate cases when they meet certain criteria.  After X number of hours (and 30 minute increments).  Case escalations can email up to 5 non Salesforce users.

image


Describe the functionality of the Case Auto-Response Rule

The case auto response rules can determine which email response will be sent when a customer submits a case through email, website, or self service portal.  This allows you to configure different email responses for different customers, and so forth.


Describe the functionality of the Business Hours

Business hours allow you to assign cases to different time zones, and escalate cases according to time zone.

Example:  East coast support staff and West coast support staff, both have business hours 8-5 and case to escalate after 3 hours.  Each get a new case assigned at 4p EST.  The East coast case will escalate the following day at 10a, while the West coast will escalate at 4p PST (7p EST).  Without different business hours per time zone configured, they would both escalate at the same time.

Note that Age Over and Age are two different entities.  Age (as defined in reporting) does not take business hours into consideration, while the escalation rules (Age_over) do use business hours.  Last time I checked into this you could get a Business Age field added from Salesforce by request only.


Configure the settings and rules for Case processing, including Business Hours, and Escalation

  1. Customize –> Cases –> Support Settings
  2. Company Profile –> Business Hours
  3. Customize –> Cases –> Escalation Rules
  • Default Case Owner
  • Notify Default Case Owner
    • Option to email case owner when a new case is assigned to them
  • Automated Case User
    • User listed in case history for default creation and actions until reassigned
  • Case Creation Template
    • Email to send to person requesting the case acknowledging creation of case
  • Case Assigned Template
    • Email to send to case owner
  • Case Close Template
    • Email sent to requestor indicating that the case is closed
  • Email Case Comments Notification to Contacts
    • When enabled allows contacts outside of the self service portal to receive notifications when case comments are updated
  • Notify Case Owner of New Case Comments
  • Early Triggers Enabled
  • Enable Suggested Solutions
  • Send Case Notifications from System Address
    • If not checked, notification updates will be sent from user that updates the case
  • Notify Case Owners when Case Ownership Changes

See “Customizing Support Settings” for more info.


Rules and the use of Email Templates

Customize –> Cases –> Auto-Response Rules

Case auto-response rules work the same as lead auto-response rules. The first rule met sends the associated email template and ends the process.  If no rule is met, the default email template is used.


Define Solutions and how they can be associated with Cases

  • A solution is a defined answer to a support issue.  For instance, the solution “turn on computer” could be the answer to the case “cannot turn on computer”.
  • Solutions have a many-to-many relationship to cases (a solution can be tied to many cases, and a case can have many solutions). 
    • See “How are Cases and Solutions related” for more info.
  • Solutions have a status field (draft, published, etc) that allow for easy maintenance and prevent premature visibility of unapproved solutions. </L
    i>
  • Solutions can be made available in the self service portal and public knowledge base.

See “How are Cases and Solutions related” for more info.


Build a Solution Category tree and assign Solutions to Categories

Customize –> Solutions –> Solution Categories

Solutions are assigned in the categories related list in on the solution record.  A solution can belong to many categories.


Define suggested solutions and explain where to use them

Suggested solutions are the top 10 recommended solutions based upon a hidden formula that rates based upon:

  • Word frequency in all solutions
  • Word frequency in similar cases with related solutions
  • Proximity of the keywords within the solutions
  • Word similarities to self-closed cases and solutions rated useful by Self-Service users

Suggested solutions can be used:

  • Case page: click view suggested solutions and it will show the user entering the case.
  • Customer Portal and Self Service Portal: Customers can view suggested solutions when they submit a case online.
  • Case auto responses:  you can add the merge field {!Case_Suggested_Solutions} and it will include these in the email.


Describe what content is accessible via the Self-Service Portal

Enterprise and Unlimited Edition only.

Cases can be logged; past cases can be viewed.  Solutions can be browsed if this option is enabled.  Suggested solutions can be enabled.  Activities can be shown if marked as available for self service portal, as can case comments if the comment is marked publicly viewable.


Describe the ways to access the Self-Service Portal

The self service portal is accessed by users through a website; this site is generated when the self service portal is enabled by the system administrator.  The system administrator can export the code or URL to the site and import this code/URL to the appropriate website.

image


Build a Case Queue, Assignment Rule, Web-to-Case, and corresponding Auto-Response Rule

  1. Manage Users –> Queues
  2. Customize –> Cases –> Assignment Rules
  3. Customize –> Self Service –> Web-to-Case (Pro+)
  4. Customize –> Cases –> Auto-Response Rules